 Last spring I started making little pouches, or pencil cases, or whatever you want to call them. I made so many, I got a little tired of the pattern I was using. After browsing around among my saved "textures" on Ravelry, I ended up making this. This texture is the same as the Vitalba slouchy and I just love how it worked up. Because of the holes in the texture, it aboslutely needs a lining, but I'm going to save how to do that for another day and let's get to the pattern right away! Supplies:
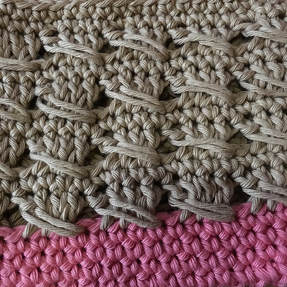
Abbreviations (US terminology): CH - chain SC - single crochet SL - slip stitch ST - stitch DC - double crochet How to work the cable stitch, tutorial by the stitchin' mommy Pattern notes: If you, like me, will be changing colors from base to body, fasten off your yarn and weave in the end so you’ll be crocheting over it when you start the next row. I’ve discovered that making a slipknot and pulling that through the starting sc secures the yarn a lot better than just pulling up a loop and having a loose end to fasten. Either way, fasten your yarn in the st where you tied off the last color, it’ll hide the potentialy little bump~ Pattern Row 1 Ch 21, sc in 2nd ch from hook and for the next 18. Sc 3 times in last chain, turn and sc 18, putting 2 in the same st that you started your first turn of sc. Sl st to first sc made Row 2-4 Ch 1, sc around (42) sl to join. If you want to change color from base to pattern, fasten off and weave in ends after row 4, and attach next yarn in same st Row 5 Ch 3, dc in next 2 st, then dc in the st before ch 3, (sk 1, dc 3, dc in skipped st), repeat around, sl st to join Row 6 Ch 1, sc in each st around, sl st to join Row 7-12 Repeat row 5-6 Row 13 Ch 1, sc around, sl st to join. Fasten off and weave in ends at this point, if you don't want a flap! For a flap: Row 14 Ch 1, sc in back loop only across the "back" of your little pouch. Row 15-20 Ch 1, sc across, turn your work. This will make a small flap Row 21 Sl st to halfway across. Ch 6, 8 or 10 - depending on the size of your button, sk 1 sc, sl in the rest of the sc, fasten off, sew on the button, and weave in all ends. Please let me know if anything doesn't add up. I will translate and post the SWE version of this pattern in due time. Meanwhile, follow me on instagram and pinterest for more crocheting goofiness. If you do follow me, pretty please tag me on instagram if you make it - I'd love to see your take on this! Happy crocheting, Jenn
0 Comments
Leave a Reply. |
