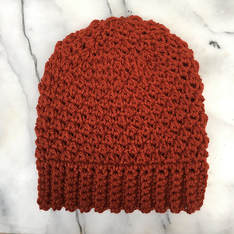
 The Glover stitch. It was the first thing I really learned fresh when I started crocheting again. First, I'd like to share a little about how I got into it - and back into it - since that plays a big part in the creation of this pattern. I started crocheting when I was a kid. It was a part of our textiles class when we were between the ages of 10-12. I crocheted these tiny, striped squares that were supposed to be helpful in taking things out of the oven. For a long time, I didn't crochet, and after a very difficult time that resulted in two sugeries and physical therapy for my hands, I found myself staring at this rainbow colored gradient yarn in the store. I bought a skein, went home, and dug out the biggest hook I could find. It was a 2 mm. Good thing for me the yarn was barely sport weight! So, I started chaining, and slowly reminded myself of the basics. I didn't know how to read patterns - in any language - and I really couldn't read a chart. Then, my knitting friend Hilda sent me over to Ravelry, and I found this whole other world. My mom got me a set of hooks for cheap from somewhere, and I bought another skein of yarn, only closer to worsted weight this time. Way back when I had just started crocheting after patterns, I found these booties on a blog called Meladora's Creations. The booties were made with a stitch the blog's owner (Candy) called the Glover Stitch, a stitch she had made up herself, and the pattern for the soles were made by Bethany over at Whistle & Ivy. It was one of the first patterns I ever followed, and it's had a very special place in my heart ever since. This, the Ophrys Chunky Hat, is an homage to the two women who got me started not only in reading patterns, but who made me think of crochet as something more than just a hobby for old ladies. (Yes, I know that's not true, but when I was a kid and started crocheting, the only women I knew who crocheted were retired friends of my Grams!) Supplies:
Abbreviations (US terminology): CH - chain SC - single crochet ST - stitch SL - slip stitch Glover - glover stitch (tutorial on Meladora's Creations) GL2TOG - Glover two together: start a glover stitch as usual by going into the front loop of the first stitch but instead of yarning over and going into the two loops next to it skip that ch 1 space and start another glover st in the next st over (3 loops on hook), finish as a usual glover stitch by yarning over (4 loops) and pulling up another loop (5 loops), and then yarning over and pulling through all loops on your hook - ch 1 as per usual to close the stitch (see pictures below) Pattern: Brim: Row 1 Ch 7, sc in second chain from hook, and in next 5 ch (6 st) Row 2 Ch 1, sc in back loop of every st across (6 st) Row 3-45 Repeat row 2 Slip stitch the ends together, turn it right side out, and ch 1 - do not cut yarn! Hat: Row 1 Sc 48 evenly across the brim, (48 st) sl to join Row 2 Ch 1, glover in same st as starting ch, and all around, sl to top of first glover st to join Row 3 Ch 1, glover st in same st and the ch 1 space from previous row, glover st all around, sl to top of first glover st to join Row 4-11 Repeat row 3 (for a slouchier version, add rows here) Row 12 Ch 1, glover st in first st and ch 1 space, gl2tog** and then make another regular glover st, +gl2tog, glover stitch in next++ repeat from + to ++ all around, sl st to top of glover st to join Row 13 Ch 1, glover st in same st, and in next st, +gl2tog, glover stitch twice++ repeat from + to ++ all around, sl st to top of glover st to join Row 14 Ch 1, glover st in same st, and in next st, +gl2tog, glover stitch twice++ repeat from + to ++ all around, sl st to top of glover st to join Row 15 Ch 1, gl2tog around, sl st to top of gl2tog to join. Finish Fasten off and cut yarn, then cut a second piece of yarn and thread on a needle. Turn the hat inside out, weave in the tops of stitches, and pull together the hat. Fasten with a couple of stitches to make sure it stays together. Fasten off and weave in ends. You're done! Please let me know if you make the hat, and if anything doesn't add up. I will translate and post the SWE version of this pattern in due time, meanwhile, follow me on instagram and pinterest for more crocheting goofiness. Pretty please tag me if you make it - I'd love to see your wonderful creations! Happy crocheting, Jenn
11 Comments
JEN
26/9/2018 22:37:45
I made this hat and it turned out beautifully. One of my favourite hats I've ever made. Thank you for sharing this pattern. 27/9/2018 13:06:00
Hi Jen,
Stephanie K
7/10/2018 18:18:42
Hi, I am starting to make this hat. Having trouble keeping track of the rows of the brim. Is there a measurement I can go by? Or just my own head? haha (writing in English, hope it's ok...thanks)
Hey Stephanie,
Patricia Kydd
29/12/2018 04:02:06
Love the pattern but having trouble understanding the GL2TOG. Is there a video showing how to do it? Unfortunately the pictures didn't help me at all. Thanks for all you do.
Oh goodness me, I didn't get the notification for this and it's been forever... I am so sorry! I am going to edit this pattern and put in that if the gl2tog is giving you a headache (turns out I haven't even been doing it the way it's written for the last year or so, oops) you can finish with hdc2tog instead. It'll work up quicker and give the same height as the gl2tog. Again, so sorry for the very late reply! 1/12/2019 04:13:16
is there a tutorial for this pattern? i am having trouble with joining rows and grover stitch 2 together. Pictures do not help. i need this hat for 3 christmas presents i already bought yarn and hook for the hats. please help me.
Hey Ruth, I have a cold right now, but since there's been a lot of questions about this both here and sent to me on ravelry, I had planned on doing a quick tutorial for it. As best I can anyway, since I don't really have the equipment for it. I tried doing one on my laptop just now and it is just awful, and I'm so cold you can barely understand me. Hey Ruth, I have a cold right now, but since there's been a lot of questions about this both here and sent to me on ravelry, I am planned on doing a quick tutorial for it. As best I can anyway, since I don't really have the equipment for it. I tried doing one on my laptop just now and it is just awful, and I'm so cold you can barely understand me anyway You can find Meladora's tutorial on the glover stitch baby booties on youtube - there she works the glover stitch in the round. Just remember that I go into the front loop of the first stitch, and not the back loop like she does in that video. Also, if all else fails, you can close the hat up with HDC2TOG - it'll break the pattern of the glover stitch but it'll be a good foundation for maybe a pompom, or just changing it up. Hope it helps some! All my best, Jenniefer
Heather brooks
28/10/2020 18:13:01
Good Morning, I can't find anything about this on your website or Ravelry account.....are we allowed to sell items that we make from this pattern? 28/10/2020 19:39:24
Hey Heather! Leave a Reply. |


